The guide will also show you how to change your mugen character's Select Screen portrait. The Select Screen portrait's default size is 120x140 pixels.
The main difference between this guide and Serj Tankian's guide is the color quality. I found the flaws in his guide which causes the portraits to come out looking really bad. I figured out the fix to those flaws and implemented those fixes into this guide. You will produce VERY high quality portraits with this guide
Note that not all of the steps will contain screenshots. I did not include screenshots for the easy-to-figure-out steps.
The hardest part is Step 3, where you really need to be careful when erasing the background, especially with certain images. Also, there are a few steps that can cause quite confusion, so be careful
It is very important to follow every step, especially when I say "make sure the settings are EXACTLY like this". Forgetting even 1 step could mess up the whole process.
There are only 4 requirements:
1. Adobe Photoshop
2. experience with editing in Photoshop
3. IrfanView
4. Fighter Factory
1. First, get any picture off the net. I'm going to use this sexy pic of Juggernaut. [img width=339 height=480]https://2img.net/h/oi4.tinypic.com/6oerfx1.jpg[/img]
2. Open up your image in Adobe Photoshop. Crop your image using the Crop tool so that u only have the portion that you want to see on the portrait.
3. Use the eraser tools to make the background transparent. This step really relies on how skilled you are with photoshop. a newbie photoshop user will have problems getting rid of garbage around the edges of the character. anyways, your image should look like this after you're done, notice the transparency of the background:
[img width=388 height=480]https://2img.net/h/oi19.tinypic.com/7xn4zfo.jpg[/img]
4. Go to File > New... to create a new image. set the width to 120 and the height to 140 and make sure background contents is set to Transparent:

5. Go to Image > Image Size... now resize your original image so that it fits onto the new 120x140 image. Then drag your original image into the new image. close the window for the original image since we don't need it anymore. So now we have this new image that's 120x140 pixels with your character's portrait:
[img width=561 height=480]https://2img.net/h/oi16.tinypic.com/8ap2n37.jpg[/img]
6. Go to Image > Adjustments > Replace Colors... this window will pop up. Take a look at the two color boxes at the top and bottom. The top color box is your Selection color and the bottom box is your Replacement color:
[img width=301 height=480]https://2img.net/h/oi18.tinypic.com/8a9vzu0.jpg[/img]
7. Click the top color box and change the R, G, B colors to 0, 0, 0 (complete black):

8. Click the bottom color box and change the R, G, B colors to 10, 10, 10.

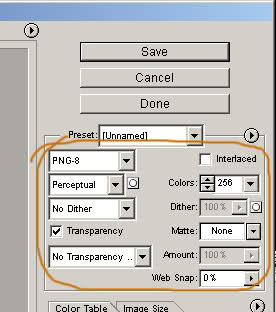
9. Go to File > Save for Web... make sure your settings on the right are EXACTLY like the settings here:

10. After saving your image, close photoshop and open your newly saved image with IrfanView. go to Image > Palette > Edit Palette... a window will show up. your palette will look different depending on the image you are editing. now, notice the color at the very top-left corner:

(note: for this next step, your colors on the portrait might come out looking messed up, but don't worry, it will be fixed after step 13.)
11. Click on that top-left color to bring up the color picker window. like in photoshop, set the R, G, B numbers to 0, 0, 0 (complete black).

(note: For the next 3 steps, I won't provide screenshots, because they're easy to figure out. if you need screenshots for these steps then you're not worth my time).
12. Now go to Image > Palette > Export Palette... save your palette to somewhere easy to find, cuz we're gonna use it again real soon.
13. After saving your palette, go to File > Reopen.
14. Now go to Image > Palette > IMPORT Palette... load up the palette you just saved earlier.
15. Finally, go to File > Save As... save your image in .PCX format.

(note: from this point on, I'm going to show you how to replace your original character's portrait with the one you just made.)
16. Now close IrfanView and open up Fighter Factory. go to File > Open Character... find your character's .DEF file and open it. (you should know where to find your character's .DEF file... otherwise yur not worth my time.)
17. After you open your character's .DEF file, you should see your character's sprite in the middle white area like this:
[img width=613 height=480]https://2img.net/h/oi16.tinypic.com/6x0hxrs.jpg[/img]
18. Click on the Sprites button at the top:
[img width=640 height=131]https://2img.net/h/oi7.tinypic.com/6sarsp4.jpg[/img]
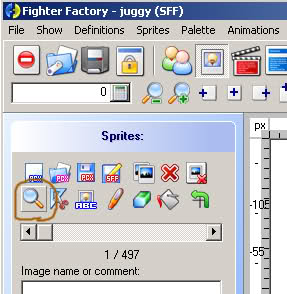
19. After u click on the sprite button, your window on the left panel will change. On the far left, click on the Find Sprite button:

20. A small window will show up. Enter in "9000" for the first slot and then enter "1" for the next slot, like this:

21. Now you should see that character's original select screen portrait in the white area. Go to the left panel again, but this time click on the Change button:

22. Find the portrait that you just saved in step 15, then open it. You should now see your new portrait in the white area. This is my new portrait:

23. You'll notice your portrait's background is black instead of transparent, but that's ok, it will come out as transparent in Mugen. Go back to the left panel and check to make sure the settings are EXACTLY like the ones circled here:

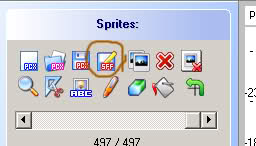
24. Now go to the left panel one final time and click the Save button:

(make sure you click the right save button. it should say "SFF" on the button. DON'T click the save button that says "PCX").
Now we're done. Enjoy your new portrait ^_^

Here are some other portraits I made:
https://2img.net/h/oi1.tinypic.com/6y4x26a.jpg
https://2img.net/h/oi10.tinypic.com/6twte1t.jpg
https://2img.net/h/oi8.tinypic.com/72r6cte.jpg
https://2img.net/h/oi10.tinypic.com/8dz0ydc.jpg
By XMugenX

